

No matter how you feel, things will always look a little brighter with some candy. It can be chocolate or sugar candy, but something sweet and delicious is often enough to bring a smile to any face. What better way to enjoy candy is to make it yourself, and it doesn’t have to be for a special occasion.
“Candy is natures way of making up for Mondays.“- Unknown
In this article we’re going to look at chocolate and sugar or hard candy, and how to make it something special using candy molds. Along the way, we will be giving you some tips on making candy and chocolate, and look at the best candy molds on the market.
Why do I need a candy mold?

If you are going a little further and making your own chocolates and candies, then a mold will add some style to your confectionary. Even if it tastes like heaven, no one wants to see a dollop on a dish, as we all know our eyes taste food well before it reaches our mouth.
So using a mold will enhance your chocolates and candies, and bring them to a whole new level. If you are planning to serve them on their own, or use them as a garnish for desserts or cakes, a stylish candy will always brighten your table.
When dealing with chocolate, silicone molds with a smooth texture work well, as they are reusable, durable, and have a perfect surface for repeat perfection. For hard candy, you need to make sure the molds will be able to withstand the higher temperatures involved.
Choosing a mold
There are two basic types of candy mold:
Chocolate Candy Mold – These can be made from different types of material. Often these days it is some form of plastic or soft silicone that can be easily removed from the object molded.
Hard Candy Molds – Are almost always made of a harder and less flexible opaque plastic. These hard molds can be used for chocolate, but are the only ones recommended for the higher temperatures involved in the liquid for making hard sugar candy.
The size and shape of chocolate molds
Once upon a time, chocolate molds were basic shapes, such as round, square, egg or diamond shaped, and for the more adventurous shaped like a leaf or maybe a small animal like a rabbit for Easter.
But that’s all changed now, as there are molds to make chocolate pieces in every shape imaginable. What is interesting is that over the years the size of chocolate molds has been getting smaller.
Twenty years ago the average high-quality mold would take about 15 to 20 grams of chocolate, nowadays similar molds are much smaller and usually only have the capacity of seven to 10 grams of chocolate.
Watch out for Water
When using a mold for chocolate, water can be your worst enemy. Professional chocolatiers advise not to wash them at all, but for most home cooks this is not really an option. The experts explain that water and the oil in chocolate don’t mix. When chocolate is removed from a mold, it leaves a slight residue of cocoa butter on the inside of the mold.
This residue gives a beautiful shine to the finished chocolates. By washing a mold, you remove that cocoa butter coating and thus take the shine off your chocolates.
If the chocolate is at the right temperature, the experts say it should be easily removed from the mold, and that a scraper or soft kitchen paper is all you need to clean the mold ready for use again.
If the molds do have to be washed, it can take three or four chocolate making sessions before the molds will turn out super shiny candies once again. So if you are at home, then the best solution is to ensure the mold is as dry as possible when you use it and maybe line with just a hint of oil to give back the shine.
Handy tips on using a candy mold

If you want a great finished product, you have to start with the best ingredients, and that means the chocolate has to be at the right temperature. Do not overheat the chocolate. You will get lumps in chocolate if it burns, and that just won’t work with candy molds.
There is a temptation to fill and fill the molds but don’t. Better not to overfill to give a beautiful even size, shape, and consistency to your chocolate pieces.
All good things come to those who wait, so don’t rush things. Let the chocolate cool, so it is nice and hard before attempting to remove it from the mold.
The great thing about making your own molded chocolate pieces, they can be stored for months in a sealed container at room temperature. Best to layer the pieces on wax paper, so they don’t stick together.
You might be tempted to grease the mold thinking it will make things easier to get the chocolates out once they have cooled. Think again, as the grease from an oil spray or shortening will only transfer a nasty greasy shine to your chocolates and they will not retain the details of the mold.
Whatever you do, don’t use a knife or any other instrument to force the chocolates out of the mold. It’s going to end badly, with a lot of broken pieces, and you’ll have to start again.
How to use a candy mold
It’s all very simple, but you will need a couple of things along with the mold, and the chocolate. Some cooks like to use a squeeze bottle, whereas other prefer a piping bag to pour the molten chocolate into the mold. You can spoon but portioning much more challenging, and so is spillage which can have an effect on the look of your chocolates. You will also need some wax paper.

You can either use your own melted chocolate or take a short cut and use candy melts. If you are using candy melts, first put a handful in the squeeze bottle and microwave in short bursts until all of them are completely melted.
You can best check by shaking the bottle to make sure there are no visible lumps. If you don’t have a squeeze bottle, you can fill a piping back with a small nozzle.
Position the tip of the squeeze bottle, or the piping bottle in the center of the mold, and gently squeeze the chocolate candy until it spreads from the center. Do not move the bottle around. Once the mold is about 3/4 full stop, and don’t try to add a little extra to fill the corners.
Now gently tap the candy mold on the table. This helps the chocolate or candy spread to the corners and removes any air that may be trapped inside the molds. This will make sure your chocolate has a smooth even appearance.
Once you have all the molds filled its time to set them aside to cool and the chocolate to harden. You can speed the process by popping the molds into the freezer for about 10 minutes.

Now that everything is nicely hardened put the sheet of wax paper on the table and invert the mold. Give it a gentle tap, and the chocolate pieces should drop straight out. If you have overfilled the molds, your pieces will have irregular edges and lack the uniformity a good cook wants.
What we have taken into consideration when reviewing candy molds
We have looked at the ease of use, and if they have a wide temperature range and can be utilized in the freezer, or cleaned in a dishwasher. W have looked at the pattern of the mold and used one example from a manufacturer who may have many similar molds of different shapes. We have checked if they are made of FDA–approved silicone and are of food safety quality.
Best Candy Molds
1. Wilton Petite

When you love chocolate and candy, what better way of showing it than with a heart-shaped mold.
The silicone cavity molds make 12 heart-shaped treats 1.5 inches wide and 1 inch deep. They are ideal for Valentine’s Day or anytime you want to express your love.
The FDA-approved silicone can withstand up to 500 degrees in the oven. The mold is easy to clean and can be used in the refrigerator or freezer and is microwave and dishwasher safe.
Pros
- Silicone safe up to 500 degrees
- Cooler, fridge, microwave and dishwasher safe
- Easy clean silicone
Cons
- Restricted lifetime guarantee
2. Bargain Paradise
For anyone trying to build a collection of molds, what better way to start than with this set of LEGO-shaped molds.
The set of eight molds have various sizes of bricks, and iconic LEGO robots/people. The non-stick silicone is FDA-approved, and BPA Free so is safe for children to use.
The joy of these silicone molds is that they will not split or crack like hard plastic.
Pros
- Silicone won’t split or break like hard plastic
- Suitable for a broad range of temperatures
- BPA free food grade silicone molds
Cons
Oversize and not compatible with LEGO bricks
3. Lucentee Silly
Bright and colorful these molds make huge LEGO-style bricks and figures
They are safe to use with hot liquids and come with a bonus Ebook full of fun ideas.
Pros
- These molds have cash back guarantee if something turns out badly
- Dishwasher Safe
- BPA free, FDA-approved silicone
Cons
- Not recommended for the freezer
4. Party Frog Chocolate

These are made my one of the main mold manufacturers in the United States. These are hard plastic molds, and need to be treated carefully if they are to last.
The molds are made of FDA-approved PETG plastic and are great for making chocolate candies.
The higher temperatures associated with hard candies may damage the plastic. On no account should the be put in the dishwasher, and should only be hand washed with warm soapy water.
The excessive heat of the dishwasher will warp the molds, and the detergent will scratch their smooth surface.
Pros
- Great detail on the mold
- Similar molds with other shapes from the same maker
- Made from FDA-affirmed PETG Plastic
Cons
- Not dishwasher safe
5. The Modern Gummy
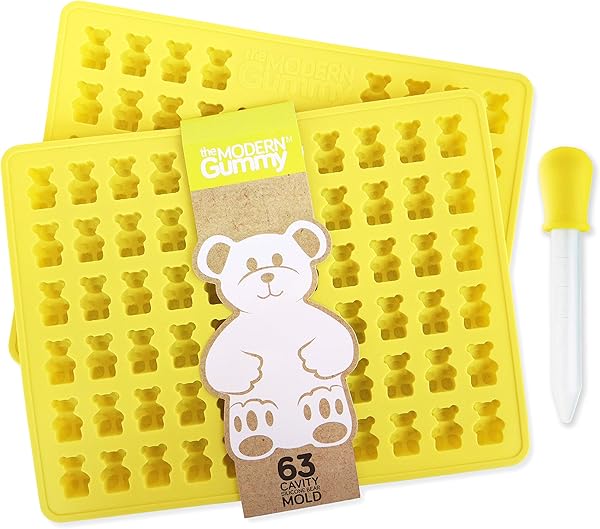
Since they were first introduced in the 1930s, everyone has loved gummy bears, and with this mold, you can now make them at home.
The FDA endorsed silicone mold makes things easy. Each mold has cavities for 63 gummy bears, so making a huge batch for all the family to enjoy is a breeze.
The pack also comes with a pipette to fill the mold. With so many gummy bears in each mold, some users found it difficult to pop the finished candies out.
Pros
- Lifetime Warranty
- Non-stick and straightforward to clean
- Comes with pipette
Cons
- Tricky to get the gummy bears out
6. Freshware Heart-Shaped
Although this mold is specifically designed for making heart-shaped chocolates, it can also be used for making soap too.
Users rave about how easy these molds are to use, and how versatile they are.
The size of the molds means that the candies are not just one bite, but two bites big, so there is even more for the family to enjoy.
Pros
- Adaptable and non-stick
- Professional quality food grade Silicone
- No chemical coatings
Cons
- None
7. Silicone Heart Mold

These are very versatile molds that can be used for anything from chocolate to crayons.
Some users had trouble baking with them. We have looked at the heart-shaped molds, but the manufacturer makes other shapes of equal quality.
So if you are looking for other shapes the maker is almost certain to have what you are looking for.
Pros
- Very versatile
- Non-stick and will not break or crack chocolate
- Can be used in the oven, microwave or freezer
Cons
- Baking with the mold needs practice
8. Star Wars Tray

May the force be with you in this excellent set of candy molds on a Star Wars theme.
For any sci-fi geek, this is the set of molds for you. If it is a Darth Vader mask or a Millenium Falcon spaceship it’s all here. Ideal if you are having a Star Wars themed party. Some users have complained about them not being that good at making ice cubes.
Pros
- Star Wars fan must-have
- FDA-approved silicone
- Wide range of subjects in the set
Cons
- Not perfect ice cubes
9. LorAnn Oils
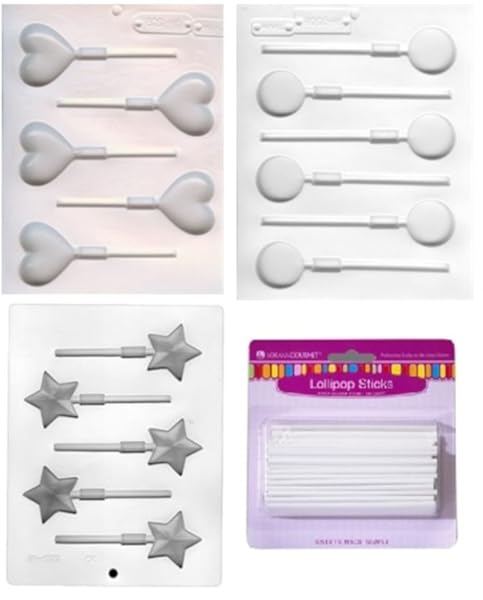
Everyone likes a lollipop on a stick, and this mold is ideal for making hard candy lollipops with no hassle.
Along with three molds you get the sticks to make lollipops all the family will enjoy. These are hard plastic molds, not silicone specially designed to work with the higher temperatures associated with sugar candy making.
Some people have experienced the hard plastic molds tearing, but most find them adequate for making lollipops and chocolate on a stick.
Pros
- Ideal for candy lollipops
- Heat resistant plastic
- Durable
Cons
- Mold could be thicker
10. Mavis’s Diary
With these molds you can actually make way more than just chocolate and candy, think pizza and bread too.
The molds can be used in ovens, freezers and toasters and are American FDA conformed.
One of the most easier to clean, the molds do not have that obnoxious plastic smell, are fadeless and pretty durable.
Pros
- American FDA conformed
- Can be used for freezing and baking
- Fadeless
- Non sticky
Cons
- Not perfect for hard candy
FAQs
How do I clean my candy mold?
Although most manufacturers say their candy molds are dishwasher safe, experienced candy makers suggest it’s not the best way to clean them. Hard and soft molds should be cleaned using hot soapy water, preferably by hand.
One point that should be stressed is that the molds should NOT be soaked in soapy water. Some of them are porous, and they could possibly absorb soap. That soap could then be transferred to the candy ruining the taste.
There are two reasons why candy makers do not like cleaning their molds in the dishwasher, one is the high heat involved, which can warp and damage the molds, and the detergent used can be abrasive to the surface leaving etched scratches, which will not give a smooth exterior. Once clean they are best put away in storage away from direct sunlight and dust.
How do I get my molds ready?

So you’re ready do make some candies, so let‘s get the molds out and start work. If you are working with chocolate, a light rub with a soft cloth or a paper towel should be all that is needed to get the mold ready. Silicone molds for chocolate should be perfectly smooth on the inside, as any imperfections will show up on the chocolates.
If the mold is scratched in any way, it will give the outside of the candy a dull appearance. If your molds have been given a tin or platinum cure, they will give an extra smooth and shiny exterior to your chocolates.
If you are making hard candy, then extra work is needed. Confectioners advise using a non-stick cooking spray on the inside of the mold before adding the mixture.
If you are going to use the molds for a fondant, or gum paste, they also need to be coated with a non-stick cooking spray. If you intend to use the molds for chocolate again make sure all the cooking spray has been removed. As an alternative cornstarch or powdered sugar can be used, but this can be abrasive to flexible silicone molds making them less than ideal for use again with chocolate.
How much chocolate do I need to make molded candy?
There is a formula for working out how much chocolate you will need to fill a mold. Measure in inches, the length, width, and depth of the cavity in the mold.
Then multiply them all together and finally by 0.708. So for a 2inch by 1 inch by 0.5–inch mold the sum will be 2 x 1 x 0.5 x 0.708, which equals 0.7 ounces per cavity. Multiply that by the number of cavities in the mold and you will know how much chocolate you will need to fill them correctly.
How do I make center filled chocolates using a mold?

Prepare the chocolate as you would normally. On a flat level surface, fill the molds with the molten chocolate. Gently tap the molds to remove any air pockets that might be present. Then turn the mold upside down over your bowl of prepared chocolate, and allow excess chocolate to drain back into a bowl leaving a coating over the sides of the mold.
Slip the mold into the refrigerator for about 10 minutes to help the chocolate set and harden. Don’t leave it in for too long as the chocolate could begin to ‘sweat’ and then it will crack when it comes back to room temperature.
Once your shells are hardened, they can be filled with the center of your choice. If you are making cream, caramel or ganache centers make sure the mixture has a pudding-like consistency after heating in a microwave. Use a piping bag to put the mixture into the hardened chocolate shells accurately.
Give the mold a gentle tap to remove any air pockets and pop back into the fridge for another 5 minutes to give the center time to harden or set. Don’t forget to leave a little room at the top of the mold for the chocolate base of the candy.
Once things have cooled and set, you can put a layer of chocolate over the center, filling the mold and finishing your chocolate. Return it to the refrigerator for another ten minutes to get everything hard.
You will know when the chocolate is completely dry when it has contracted from the sides of the mold. If you are using a see-through mold it will be apparent when there is no longer a wet look to the chocolates.
Then all you have to do is turn the mold upside down, and with a gentle tap, they should fall away from the mold. At this point, professional candy makers will only use soft linen gloves to handle the chocolates to prevent leaving fingerprints over their delicious creations.
The chocolate candies can now be decorated as you wish, and then stored in an airtight container in a cool and dry place such as a cupboard or pantry.
What is tempered chocolate?
Tempering chocolate helps in making it smoother and shinier. It makes your chocolate candies look much more professional. The tempering process involves putting pieces of chocolate into your already softened and liquid chocolate mixture before pouring into molds.
In this way, the chocolate helps with the cooling process making it more gradual, and this inhibits the separation of the various cocoa butter and solids to give a smooth even and shiny surface to your chocolate.
Why won’t the chocolate come out of the mold?
If you are using silicone molds, this should not be a problem, but if you are using metal or plastic molds, it is most likely due to them not being the right temperature. If they are too hot or too cool, the film of chocolate deposited on the mold surface can stick to it.
Best to keep molds a little warmer than ambient temperature to stop this happening. To unstick you can pop the mold in the freezer to allow it to harden a bit more, which should shrink the chocolate a little and thus allow you to get the chocolates out of the mold.
My molded chocolate looks dull and unappetizing

This could happen for a number of reasons:
Humidity: You picked a humid day to make your candies, or the room itself is too damp. When you place the chocolate in the refrigerator or freezer, it had too much moisture. Humidity causes condensation on the chocolate which the leads to the dissolving of sugar on the surface. The sugar then recrystallizes, which gives your chocolates a dull appearance
Molds: The molds themselves are not smooth, or were greasy. They also could be in a bad condition or not clean
Centers: If you made chocolates with centers, the centers were too cool when you poured in the final chocolate
Cooling temperature: The refrigerator or freezer was too cold when you cooled the chocolate, so it formed condensation
Tempering: The chocolate may have been over tempered it. If this happens, the cocoa butter crystals will grow, so they don’t allow light to reflect and give a shiny surface to the chocolate
How do I make sugar candy?
Compared to using chocolate to fill your candy molds, sugar candy is not just an art but science as well. To be successful a good candy maker has learned the art of controlling sugar crystallization.
There are a whole number of factors that determine the type of sugar candy you are making, and how it will turn out:
- The kind of sugar used in the solution of sugar dissolved in water
- The temperature of the solution
- The concentration of the sugar solution
- The rate of cooling of the solution
- The amount of work or kneading put into the sugar paste
- Any ingredients added to the sugar solution
Now comes the science of turning sugar into the hard transparent confection we all love. The sugar solution needs to be heated to 300-310F (150-155C). This is known as the hard cracking of sugar. The temperature of this cracking is critical to the process, and the use of a candy thermometer, although not essential, is highly recommended especially for those new to candy making.
Because the temperature is so critical, it is best to check the accuracy of any candy thermometer you might have. The easiest way to do this is to put the thermometer in a pan of boiling water. Let it stand in the water for about five minutes and see what it is reading. It should be 212F (100C) if it is higher or lower than that take it into account when measuring the temperature of your sugar solution.
For sugar to turn from granules into hard candy or glass, it needs to be heated and cooled properly. If uncooked sugar crystals are introduced into the candy syrup, it will go back to its original large crystal state, and we don’t want that.
To avoid it, we must allow the sugar syrup to come to the boil gradually, and then make sure any sugar granules sticking to the edge of the pan are brushed into the boiling mass. It is important that anything you use when stirring the sugar syrup is dry and clean.
At this stage you can add any color or flavor you want to the sugar syrup, making sure the temperature is within the heat range we talked about earlier. Once everything is mixed the sugar syrup can me poured into your candy molds. It is best that the sugar candies are allowed to cool naturally to room temperature and not be quickly chilled or frozen.
Why can’t I make good sugar candy on a hot, humid day?
Believe it or not, but the humidity and the barometric pressure significantly affects candy making. High humidity kills good candy making, whether it is in the sugar itself of in the atmosphere. Professional candy makers often make sure their sugar has been dried before using.
To do this it is placed inside an airtight container with a strong desiccant to absorb any moisture. Pure blue silica gel is best. Good confectioners won’t attempt to make sugar candy on a humid day. With a relative humidity above 35%, the sugar will begin to break down as it cools, and will get very sticky and become difficult to get out a mold. So best to work in a room with an air conditioner and a dehumidifier, or a dry winter day.
My candy tastes gritty, what am I doing wrong?
The sugar syrup has crystallized, and there are the wrong size crystals in the mixture. This can be due to too much stirring, not enough stirring, or beginning to stir too early in the process. It all depends on the recipe you are following. Some recipes call for no stirring at all.
However, should you have to stir always used a wooden spoon. A metal spoon will conduct the very high temperature of the sugar syrup solution and become too hot to hold. A plastic spoon or spatula could easily melt with the extremely high temperatures, so a wooden spoon is best.
During the boiling process of the sugar syrup to remove water and to concentrate the liquid scraping the sides of the pan is important to prevent sugar crystallization. However, the opposite is true during the cooling process as this helps create sugar crystals.
This problem could also be caused by not boiling the sugar syrup long enough, or for too long. The sugar syrup has to be boiled at the right temperature for the recommended time in the recipe to get the proper sugar saturation for the particular candy you are making.
Why do I get separation when making a butter candy?

What usually happens is there is a breakdown between the boiling sugar and water mixture just as it reaches the desired temperature. It is best to take the pan off the heat and stir gently immediately. This should recombine the ingredients if you use a medium heat to get the syrup back up to temperature relatively quickly.
Make sure you have used a high-quality butter in the recipe, not margarine. Margarine usually has a higher water content, which hinders the sugar syrup making process.
My hard candy doesn’t come out of the mold…
This will not usually happen if you are using silicone molds. Nothing sticks including fat–free substances like sugar. If you are using a metal mold, make sure it has been properly greased beforehand with a non-stick cooking spray. Also, make sure the syrup you are pouring into the mold does not contain any air bubbles.
How do I make sure my mold is 100% silicone?
There is a simple test you can do to check if the maker of your mold has added filler to the manufacturing process. This added filler does not give a smooth release of the candy from the mold. To check, just twist the mold. If there is a color change, usually to white, it means there has been filler added to the silicone made to use the mold. If there is not change to the color, then you can be sure the mold has been made with 100% silicone.
What does BPA Free mean?
BPA or Bisphenol-A is a chemical used in the production process of reusable plastic products, the sort of thing you might store leftovers, or use multiple times. This type of chemical has reported health effects on people, particularly the unborn and infants.
The problem with BPA chemicals is that it can leach out from the plastic container into the food or beverage inside. So it is a better look for and uses plastics that are going to come into contact with foodstuffs which are BPA Free.
What is FDA–approved silicone?
Silicone rubber is often used in food processing and packaging. Food grade silicone is inert and does not affect whatever it comes in contact with. This type of silicone was specifically developed for foodstuffs and consumables.
The US Food and Drug Administration (FDA) regulates all the materials used in the food industry. FDA approval means that the silicone used meets all the standards set for food products, and is safe to use around the kitchen – certainly candy molds are included!